Appearance
Grab Cloud Printer User Manual
(Quickstart)
1. Before installation
1.1 Package contents
The Grab Cloud Printer package includes the following items:
| Item | Description | Qty | Note |
|---|---|---|---|
| 1 | Grab Cloud Printer | 1 | Main device |
| 2 | Power adapter | 1 | Varies by country/region |
| 3 | Power cord | 1 | Varies by country/region |
| 4 | Quick start guide | 1 | This document |
| 5 | Paper roll | 1 | 80mm thermal paper |
| 6 | SIM needle | 1 | For SIM card installation |
Note: The power adapter and power cord included in the package will vary by country or region.
1.2 Key functions
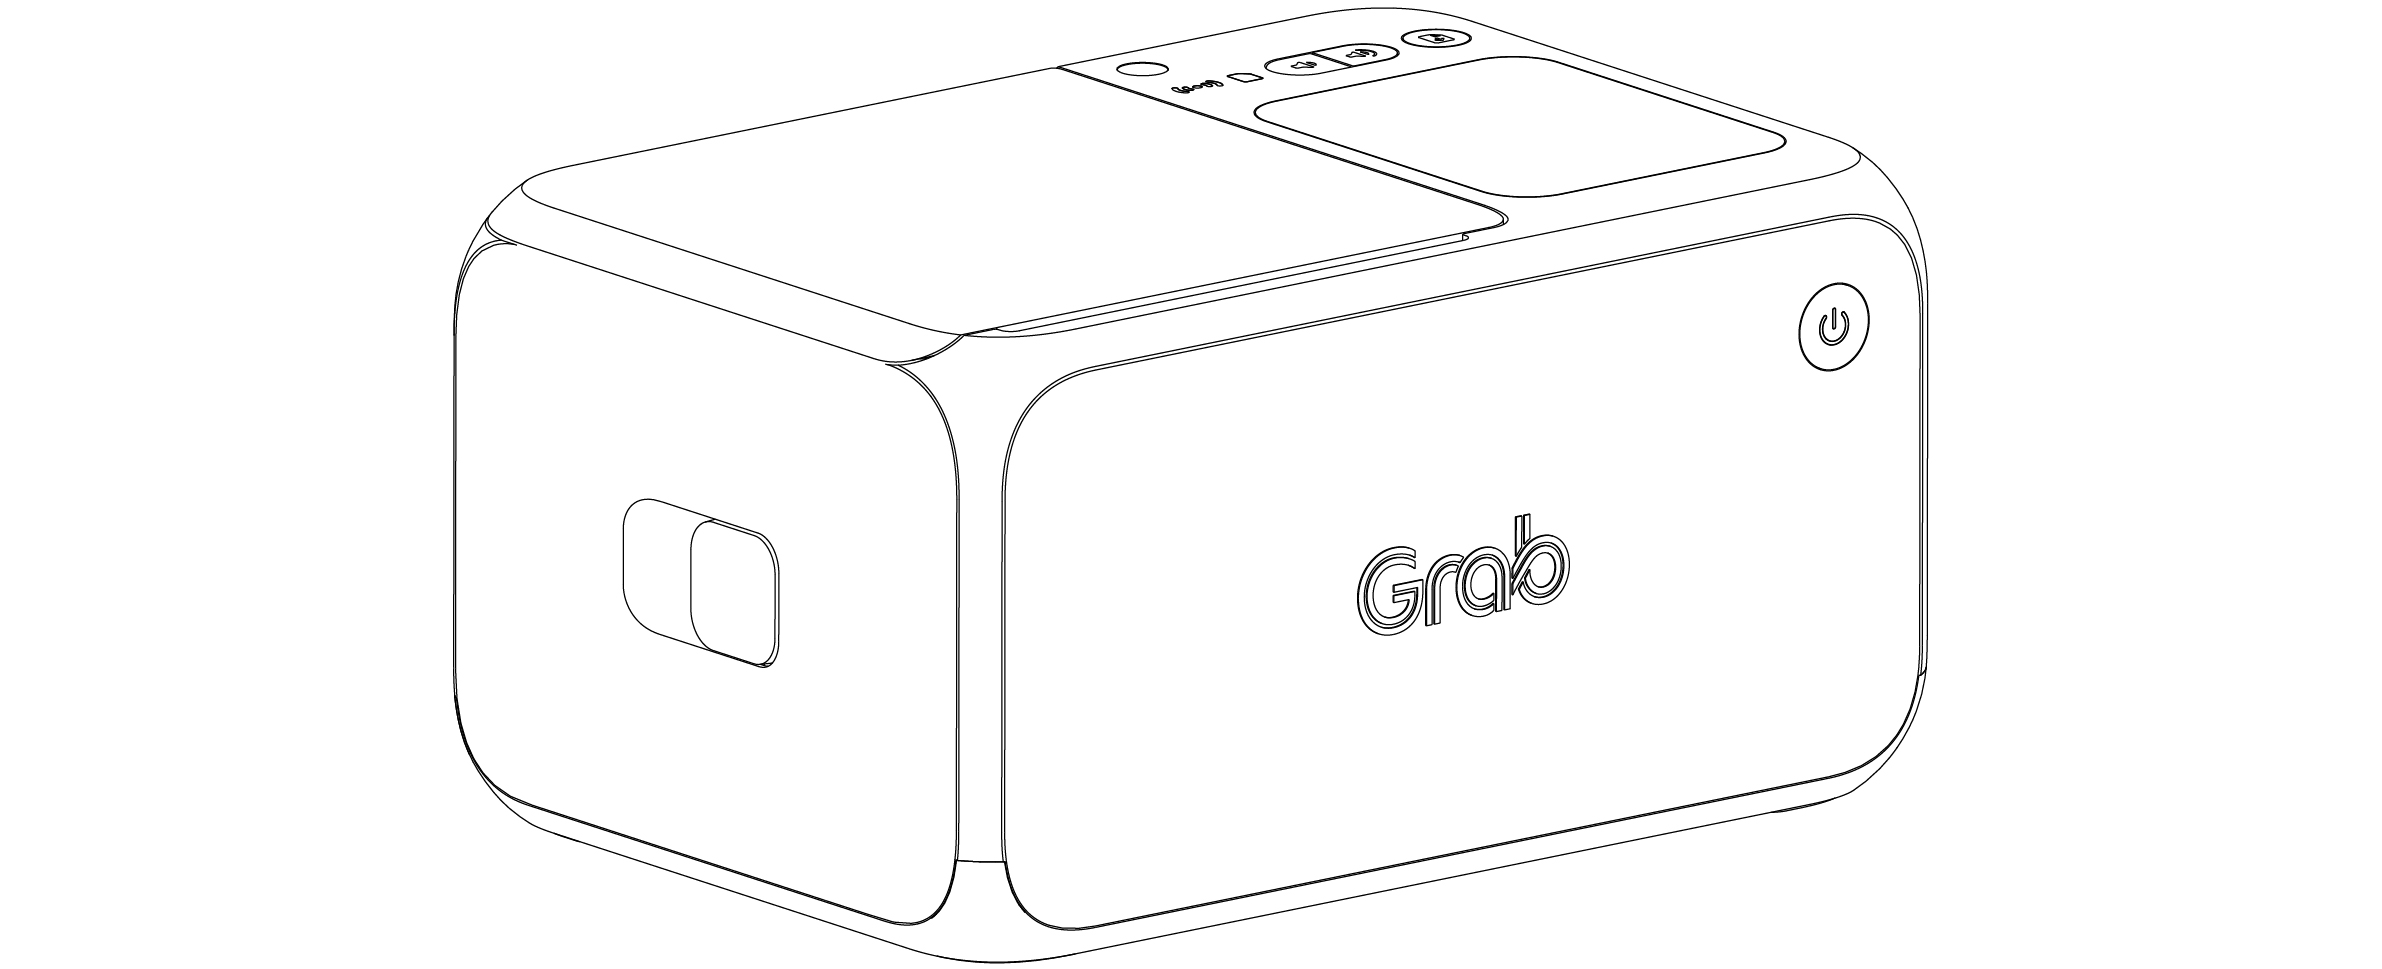
The Grab Cloud Printer features several key functions and interfaces:
Perspective view: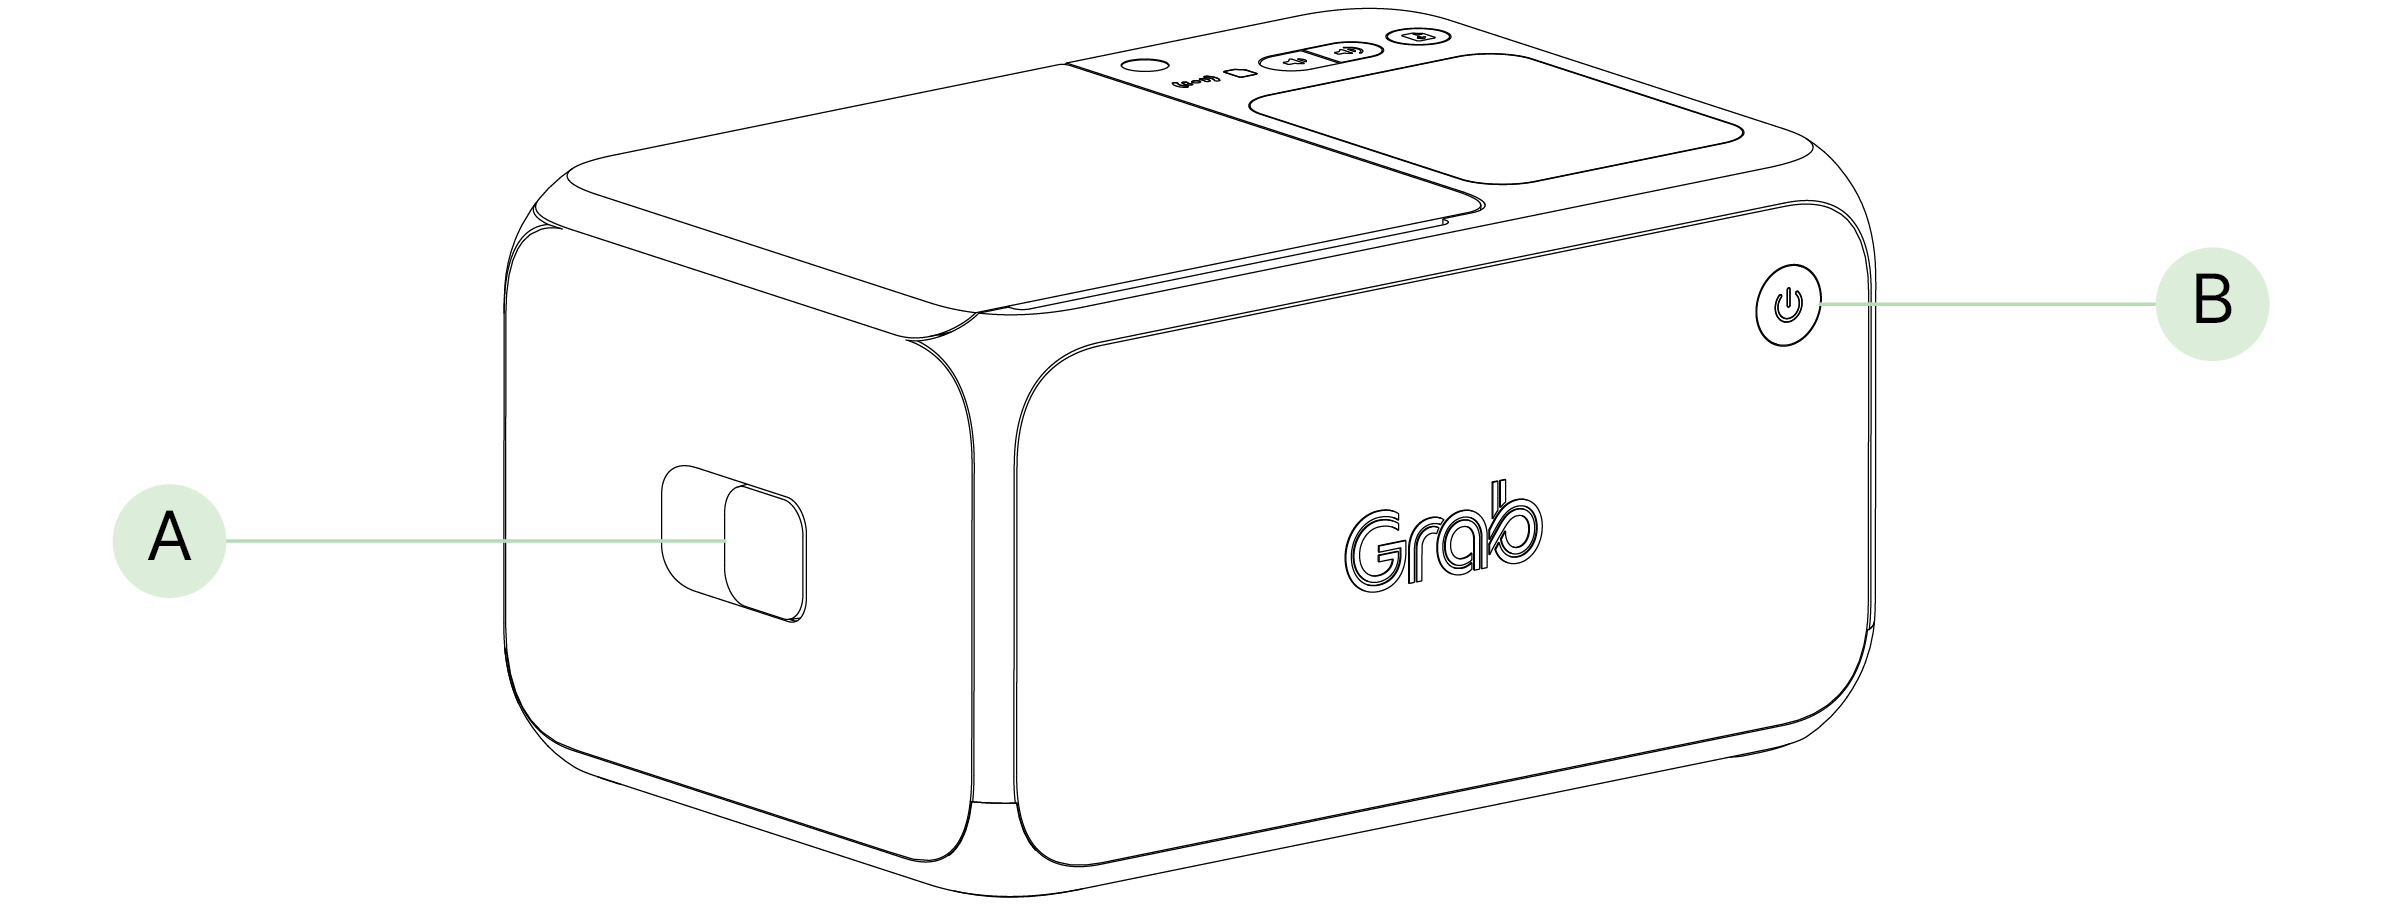
Top view: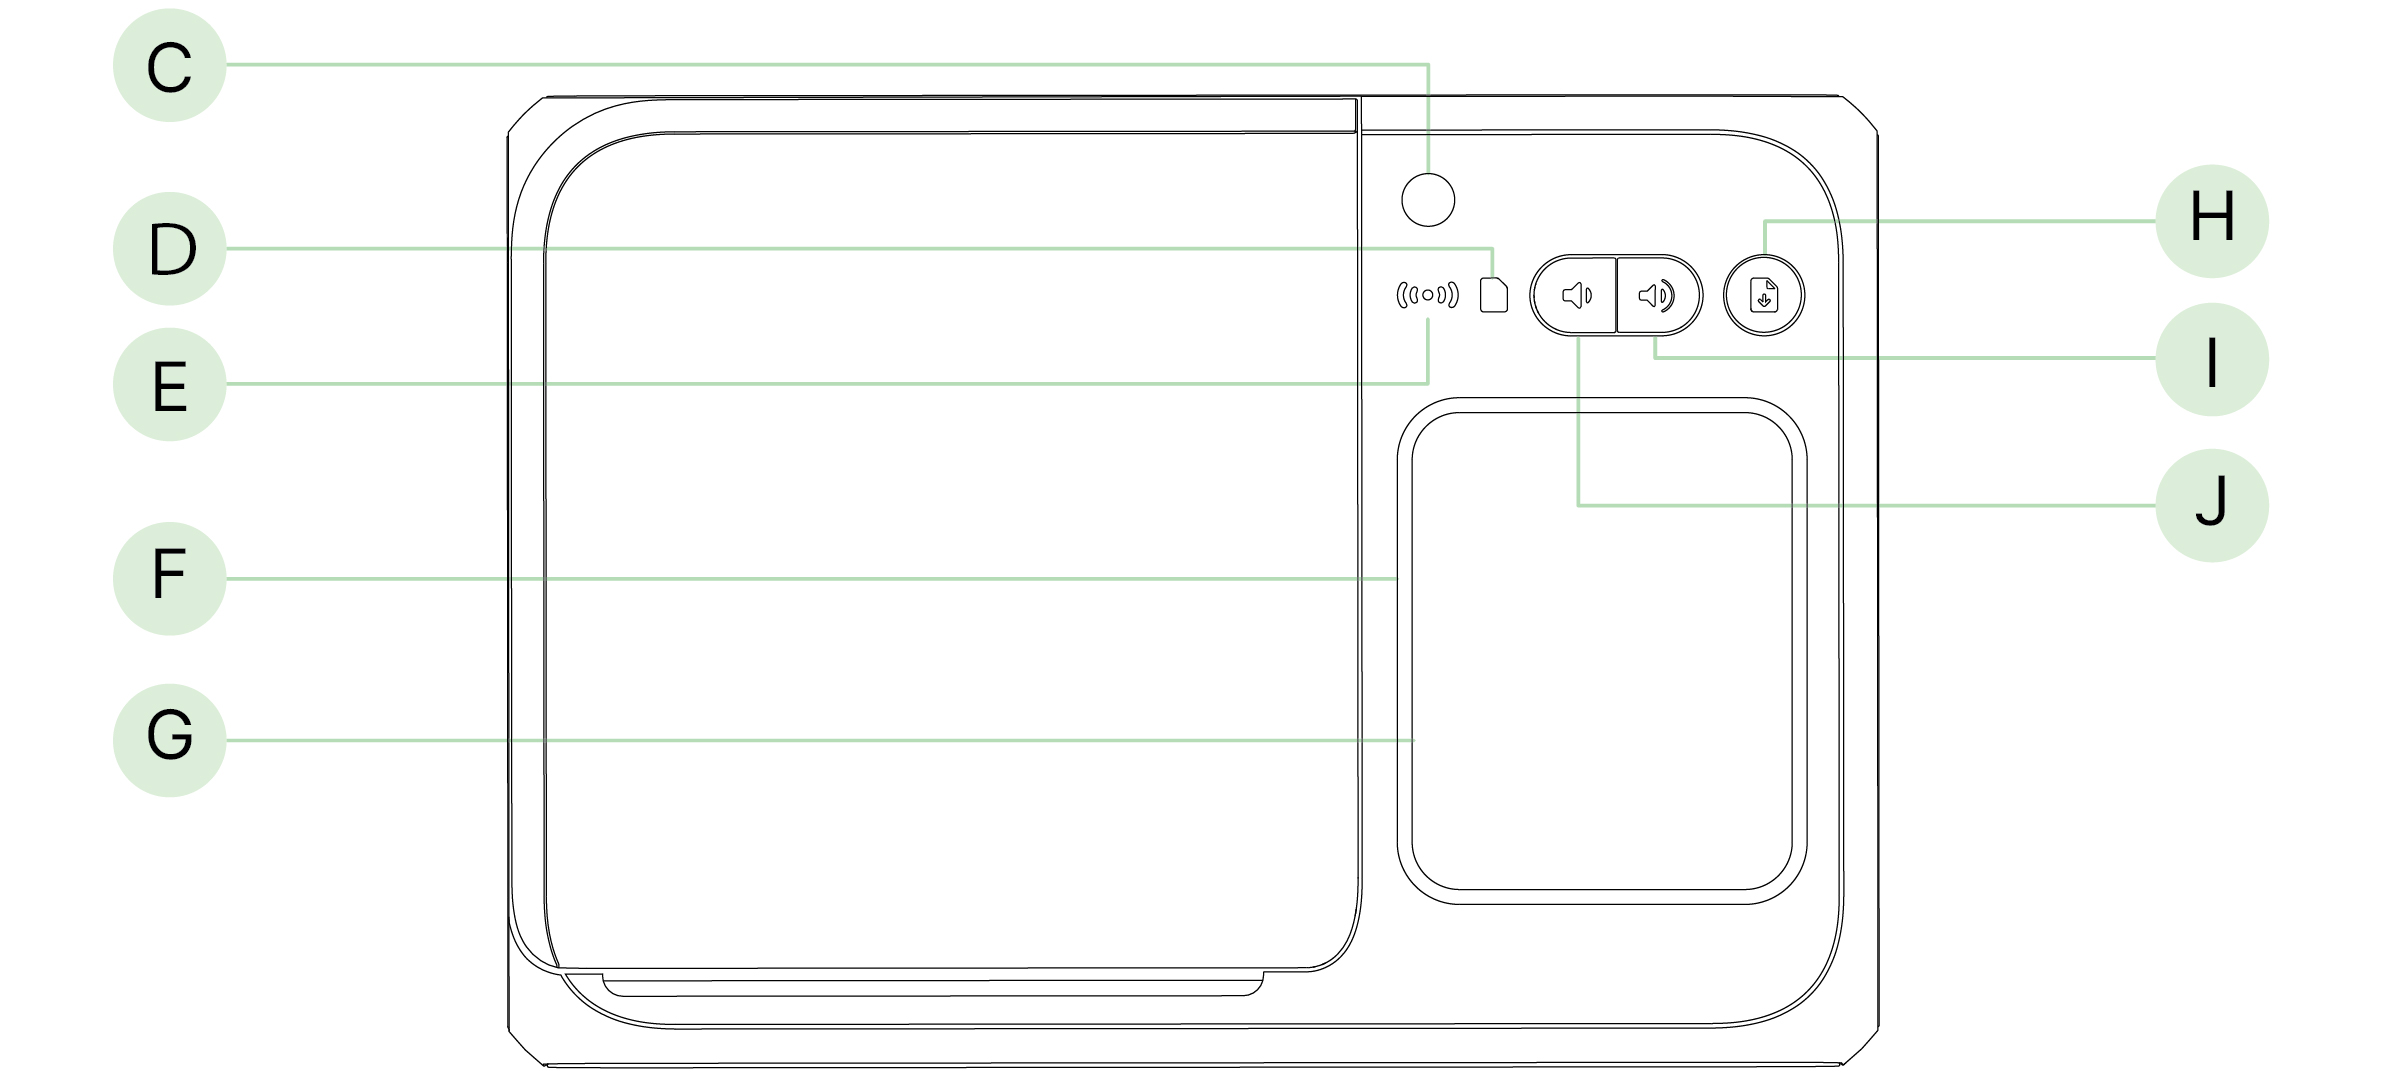
Back view: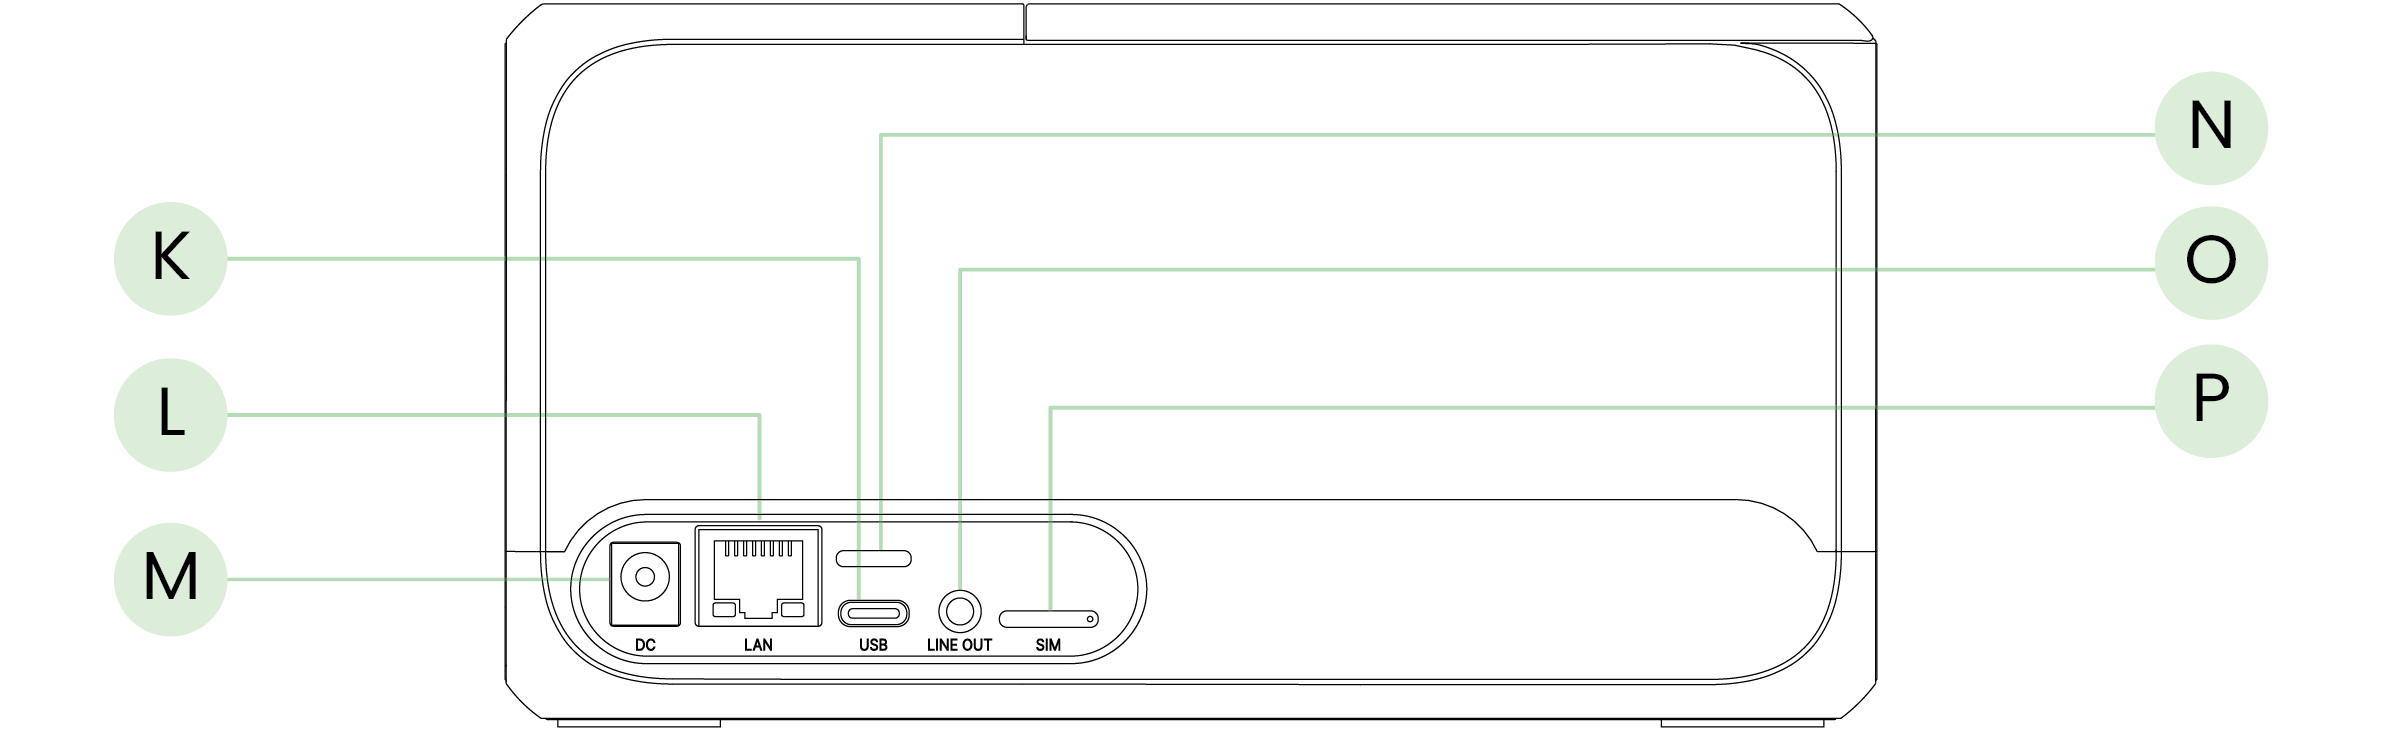
Key components:
- Lid open button: Opens the printer lid for paper loading
- Power button: Turns the printer on/off
- Paper supply LED: Indicates paper status
- Connection LED: Shows network connection status
- Scanner LED: RGB tri-color indicator for various states
- Paper feed button: Manually feeds paper
- Volume up/down buttons: Adjusts audio volume
- Function button: Access to debug information
- USB-C port: For USB connections
- Network cable port (RJ45): For wired network connections
- Power port: DC power input
- 3.5 mm audio-out port: Audio output
- SIM card slot: For cellular connectivity
1.3 LED activity overview
Understanding the LED indicators is crucial for proper operation:
| LED | Status | Activity |
|---|---|---|
| Power button LED | Power on | White light on |
| Power off | No light | |
| Paper supply LED | Normal status with sufficient paper | No light |
| Paper supply is lower than 15% | Red light on | |
| Abnormal status (paper jam, out of paper, lid open) | Red light blinking | |
| Connection LED | Connecting to network | White light blinking |
| Connected to network | White light on | |
| No network/network error | No light | |
| Scanner LED | Normal status | No LED light (background light only) |
| Scanning | White light blinks once with a beep sound effect | |
| Incoming order/printing receipt | Green light on for 5 seconds with a voice prompt | |
| Scan failure/invalid QR code | Red light blinks once with a voice prompt | |
| Hardware failure/overheating | Red light blinking with a voice prompt |
2. Installation Steps
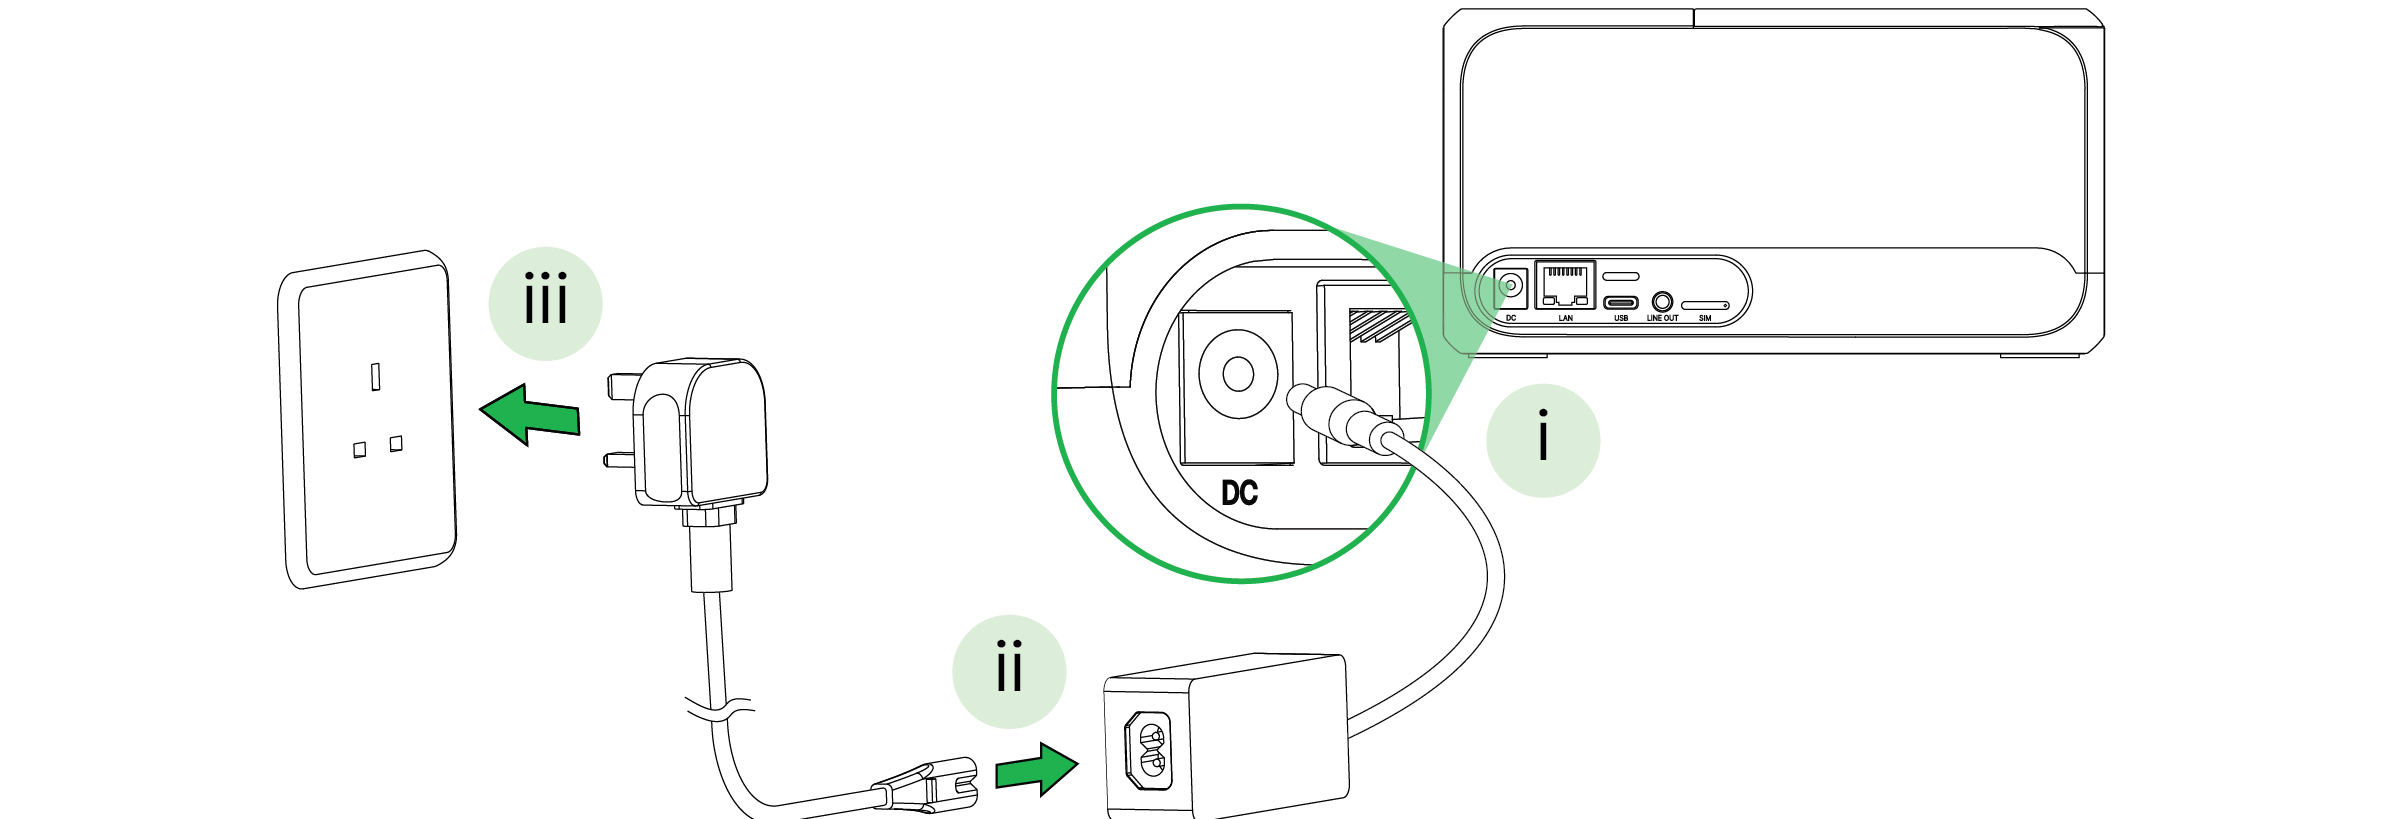
2.1 Turn the printer on
Step 1: Connect the power adapter to the printer (i). Then connect the power cord to the power adapter (ii) and power supply (iii).
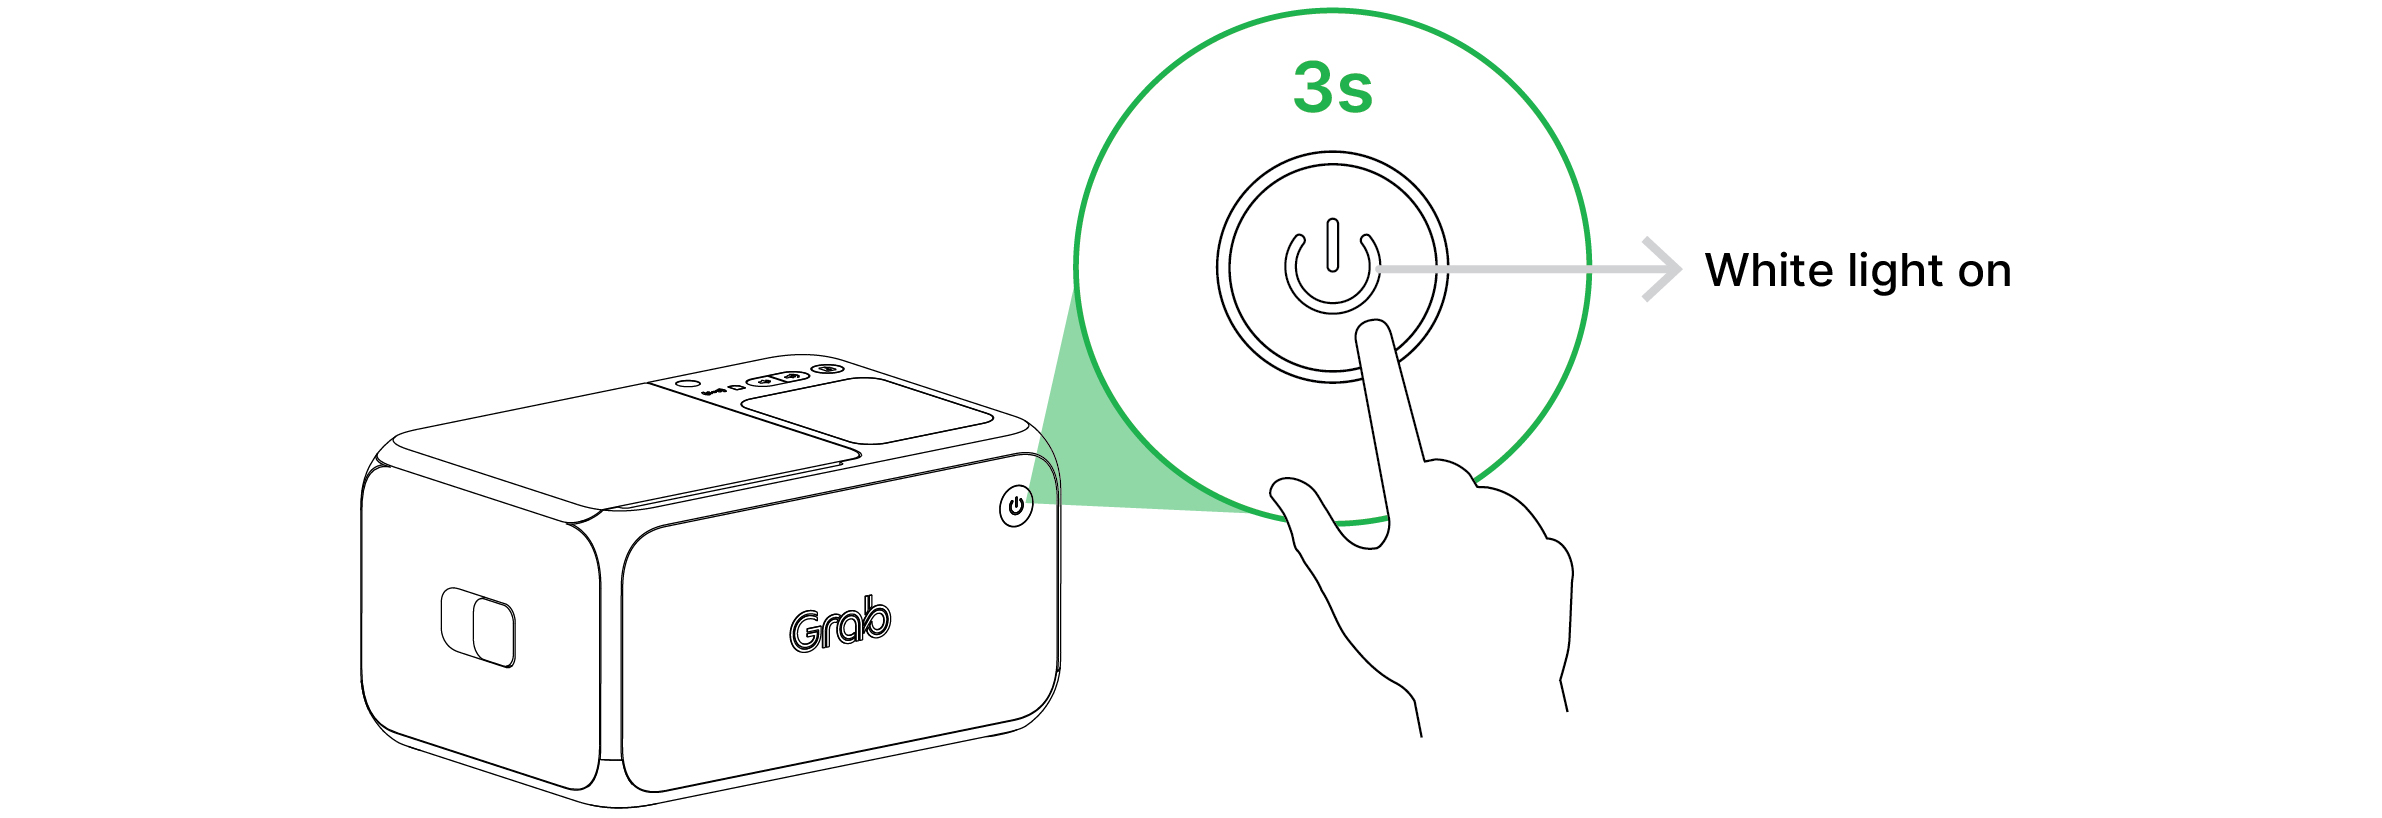
Step 2: Press the power button for 3 seconds until the power LED lights up.
2.2 Wait for connection to network
The printer will automatically connect to the internet.
Once connected, the connection LED will light up.
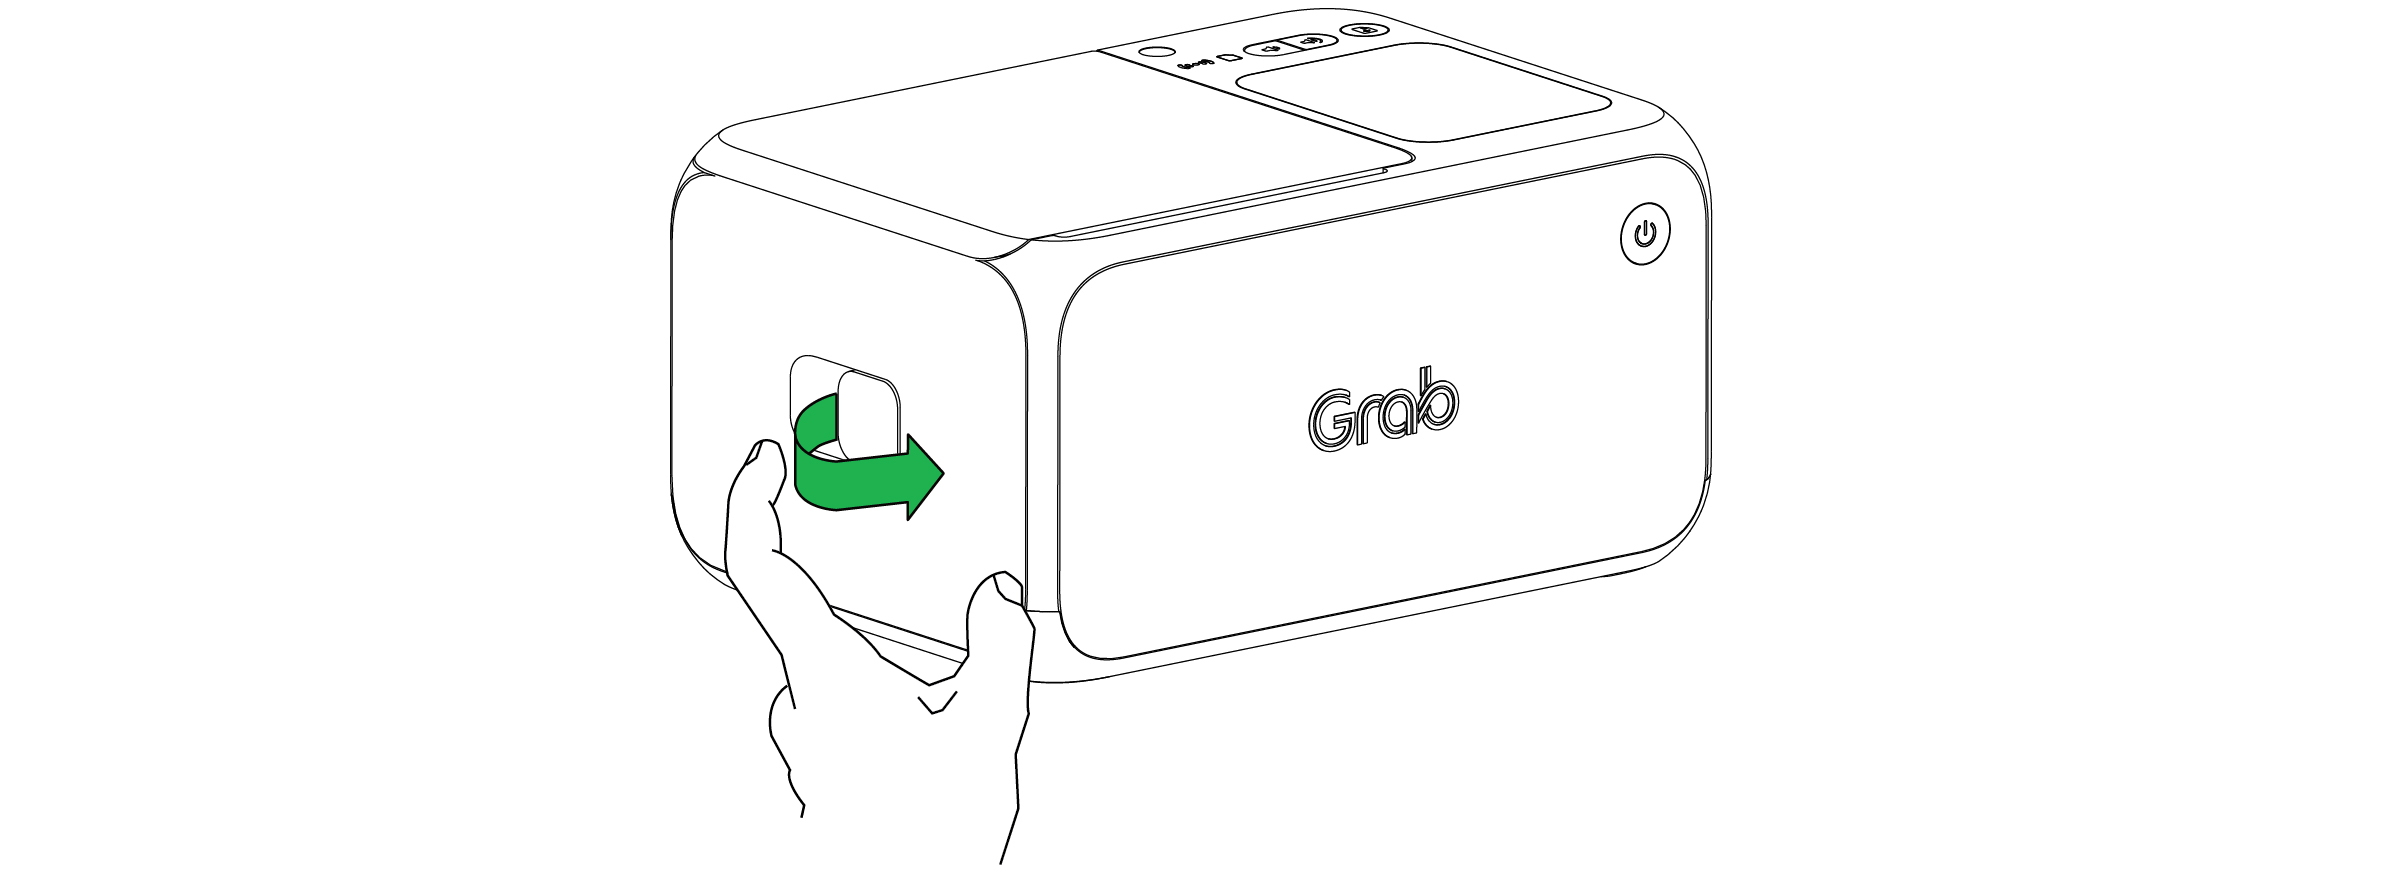
2.3 Load paper roll
Step 1: Push the lid open button on the printer's side outward to open the printer's lid.

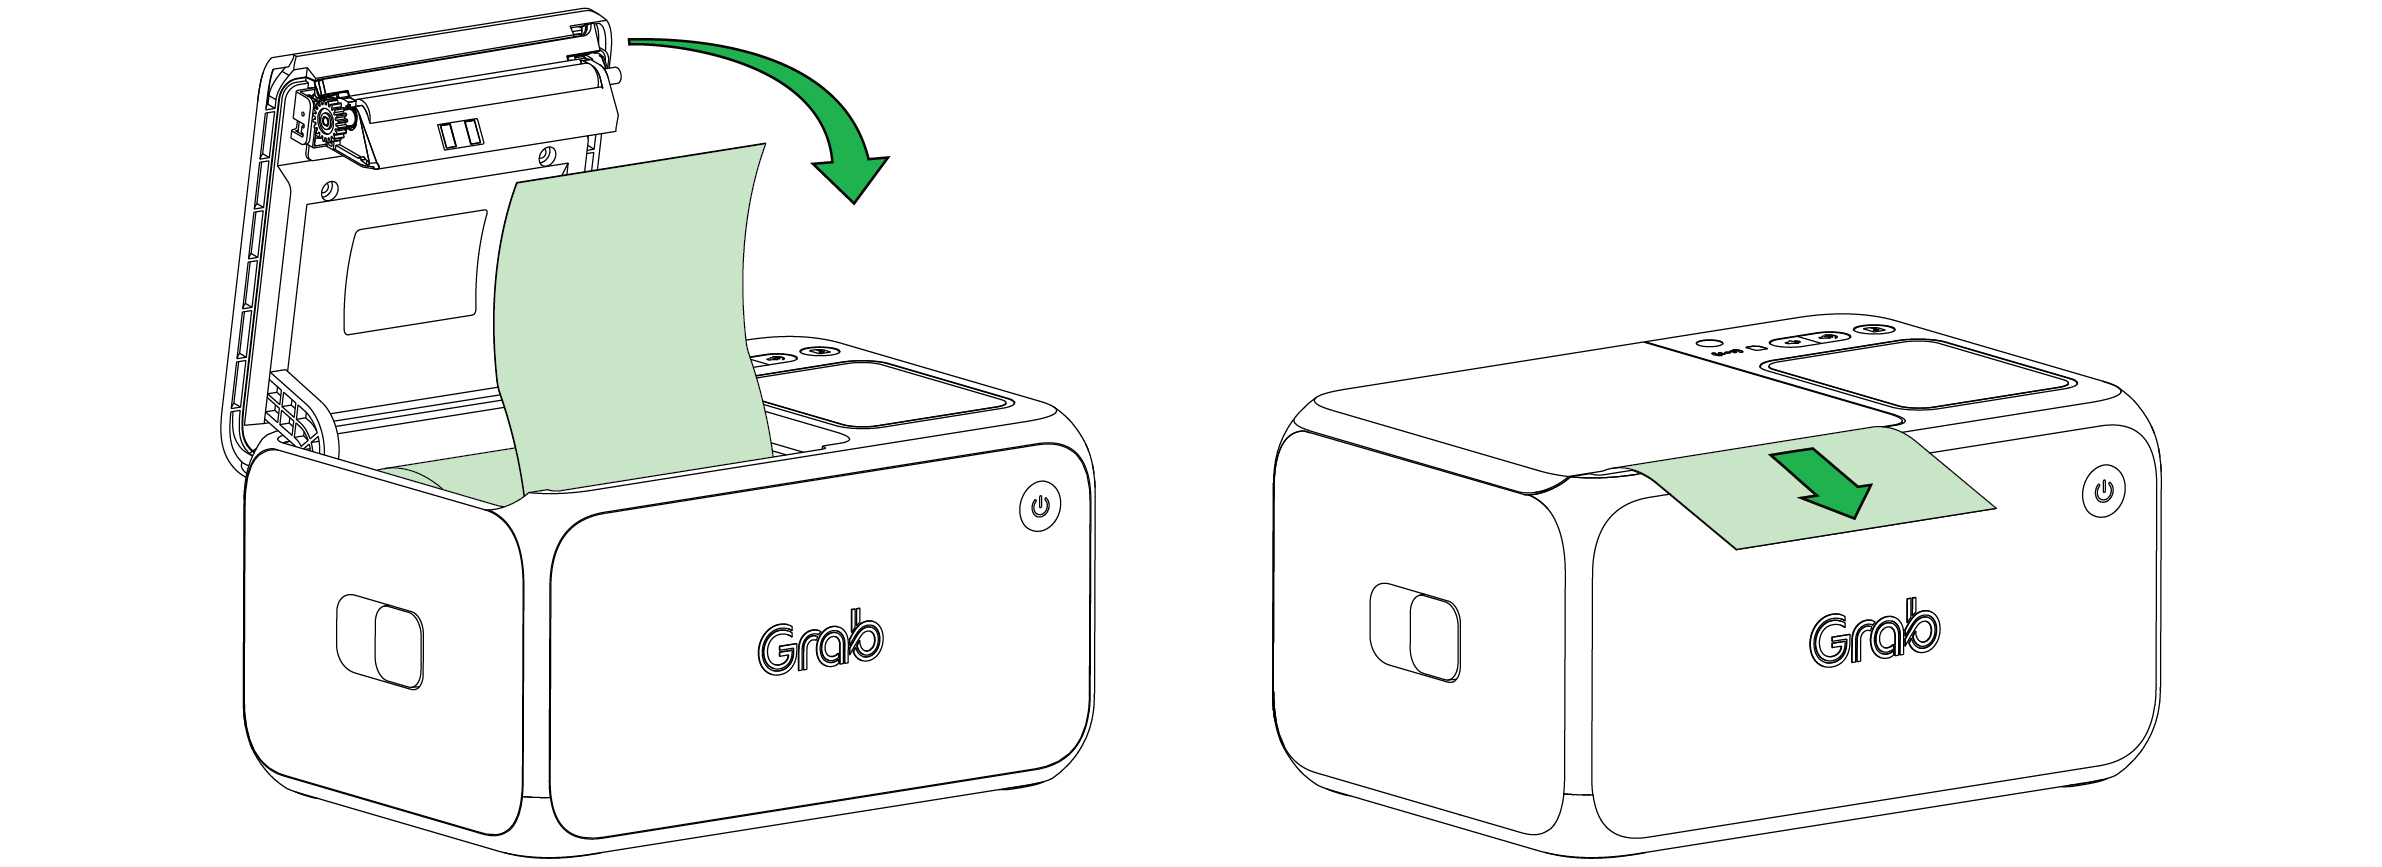
Step 2: Load the paper roll in the printer in the correct direction.
Step 3: Close the lid and ensure at least 5 cm of paper extends out from the printer.
Step 4: Wait for the welcome page to be printed.
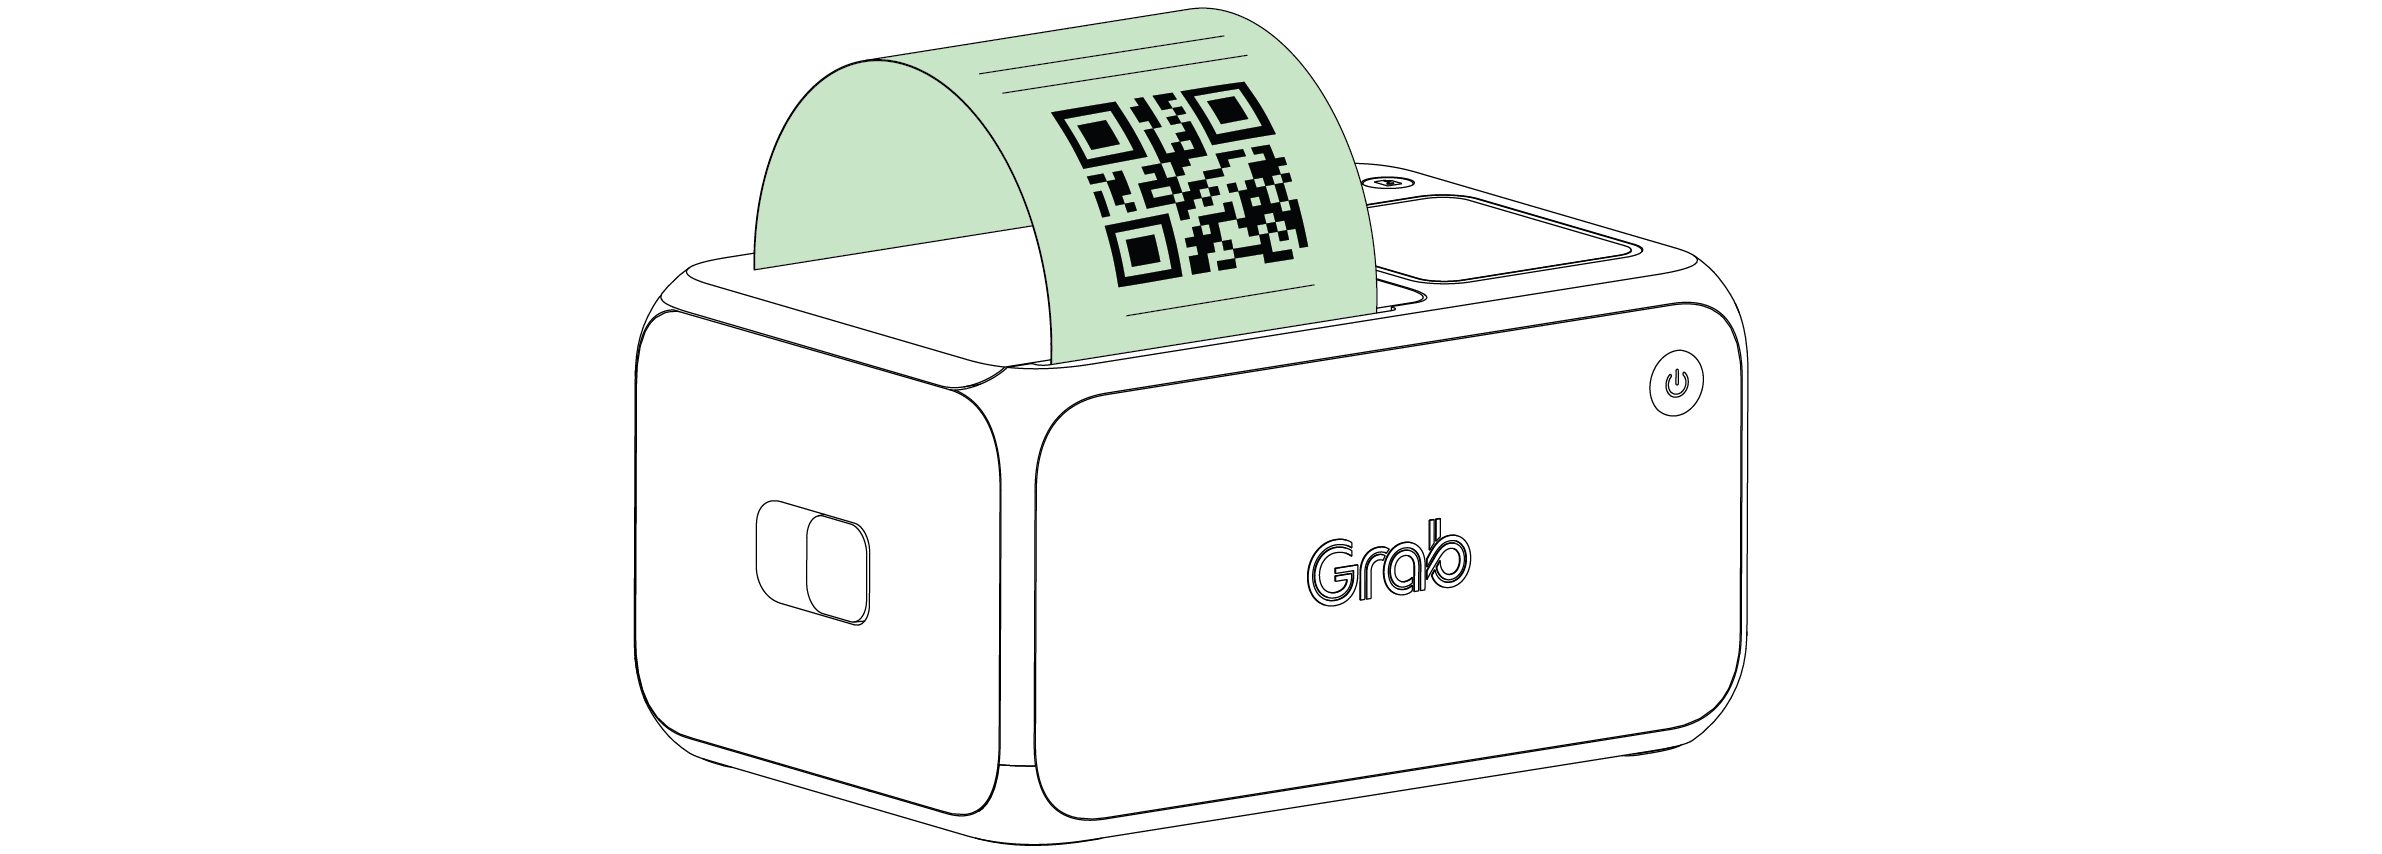
2.4 Scan QR code
Step 1: Scan the QR code printed on the welcome page with your GrabMerchant app to pair the printer with your account.
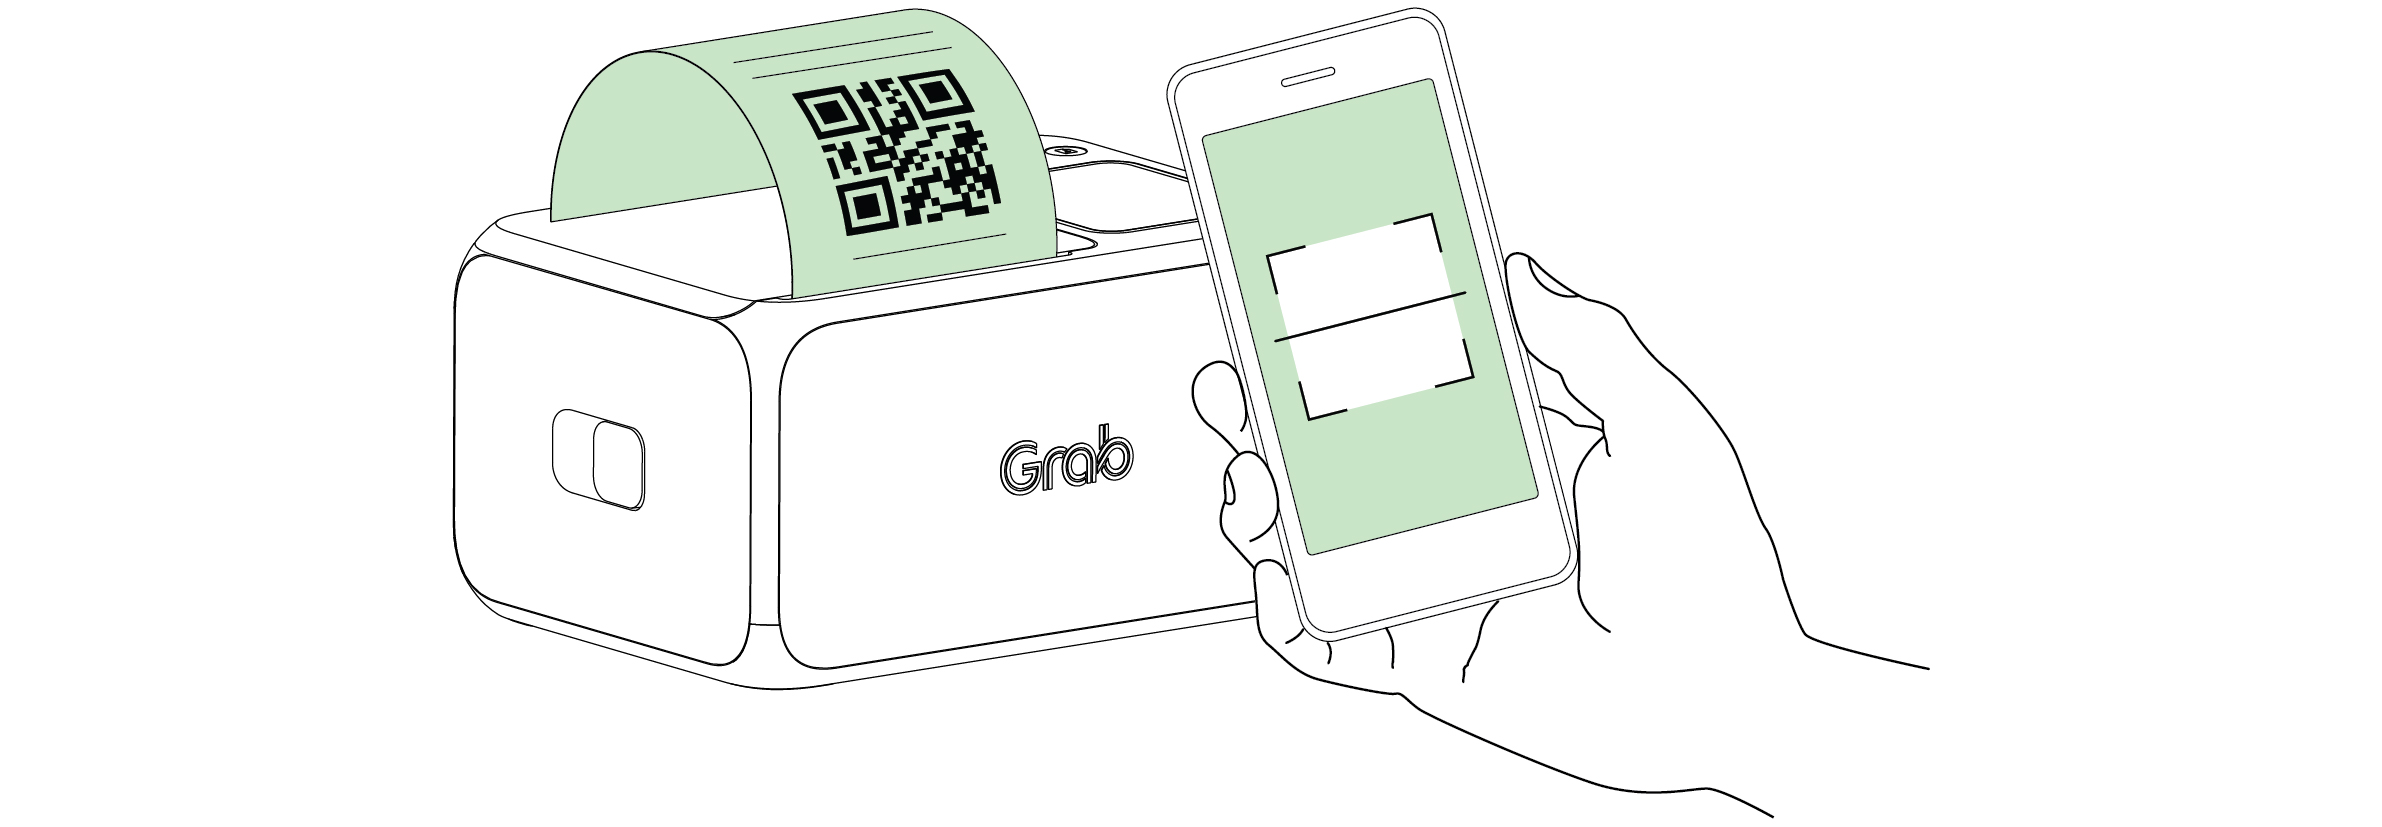
Step 2: Download the GrabMerchant app using the QR code above if you don't have it.

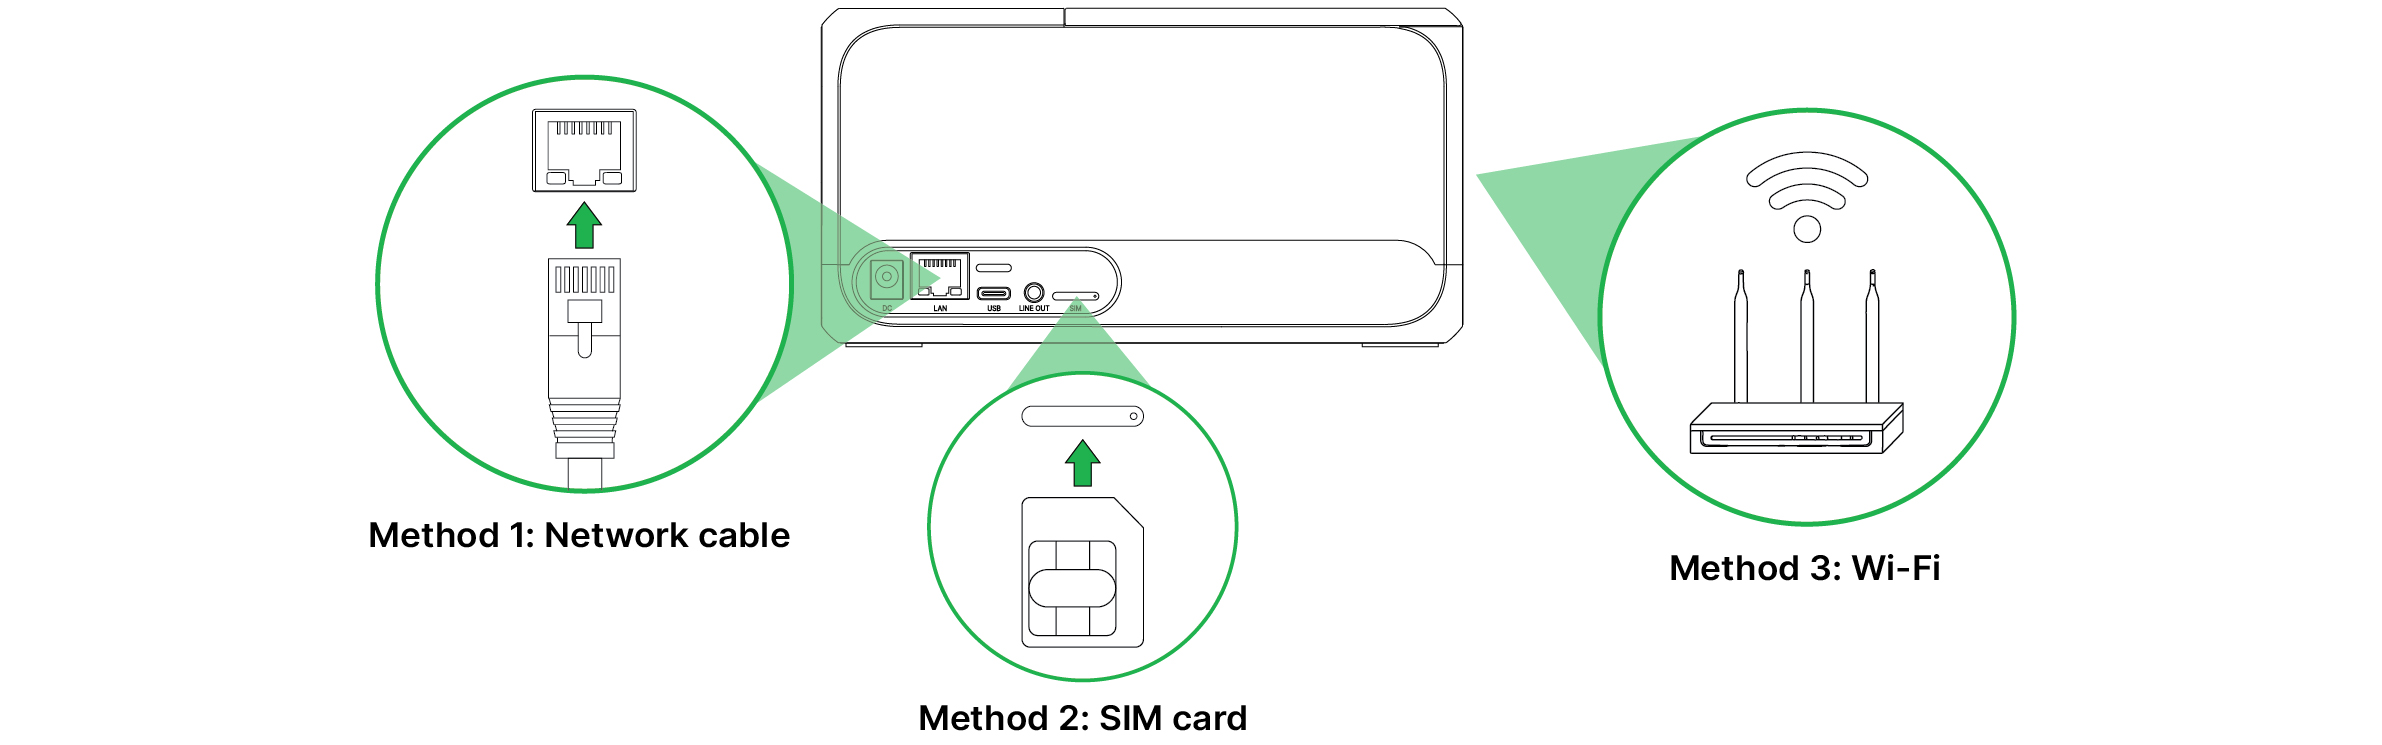
3. Connection Methods
3.1 Bluetooth Printing Setup
Grab Cloud Printer not only supports cloud printing but also universal Bluetooth printing. Please follow the steps below for setup:
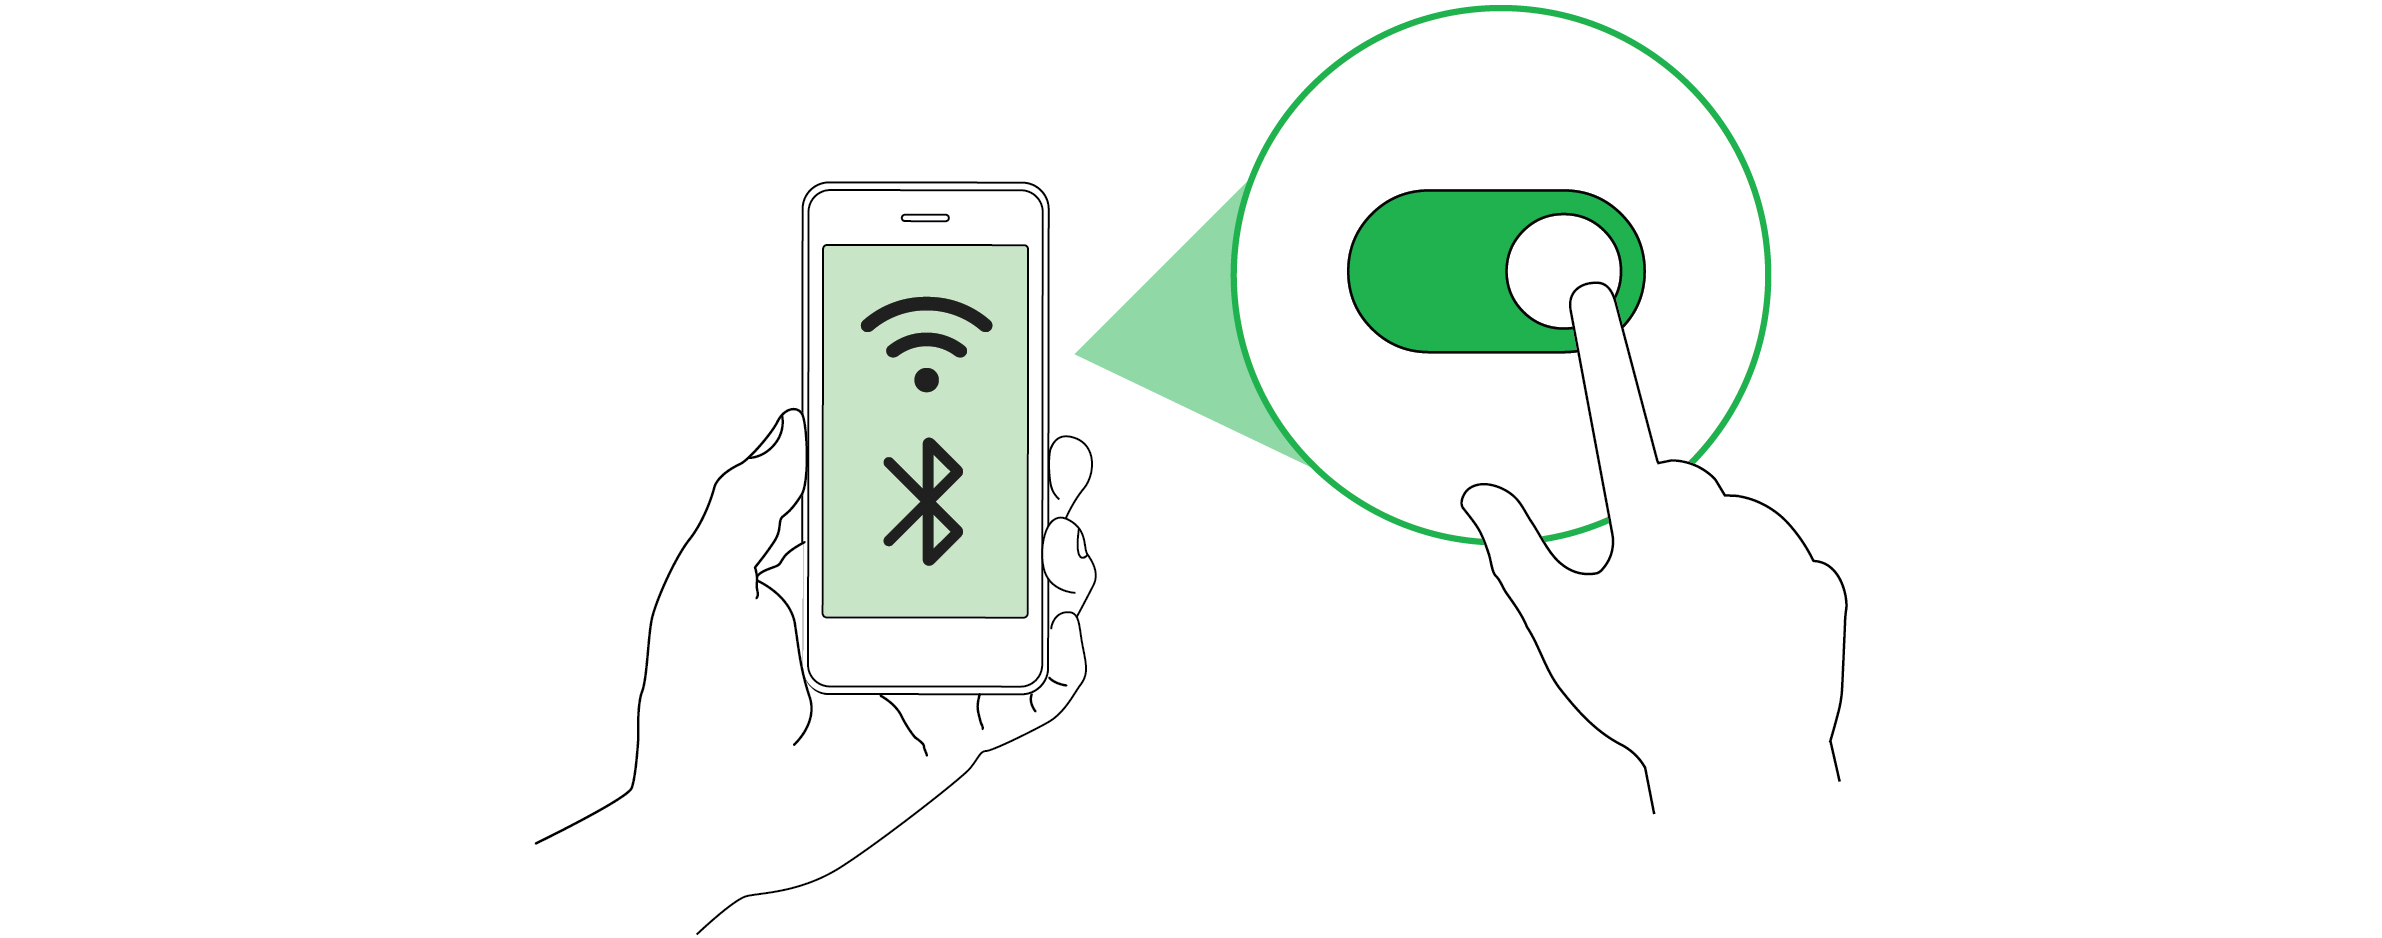
Step 1: Enable Bluetooth Scanning on Your Device
- Ensure that Bluetooth is enabled on your device (mobile phone or tablet) and that it has Bluetooth access permissions.
- Scan for printers on your device:
- Apple iPhone (iOS): Go to "Settings" → "Bluetooth." Here you can turn Bluetooth on or off, and view and pair available Bluetooth devices.
- Android Phones: Usually, go to "Settings" → "Connected devices" or "Bluetooth" or "Connection & sharing" (specific names may vary depending on Android version and phone brand). Here you can turn Bluetooth on or off, and search for and pair new devices.
Step 2: Complete Bluetooth Pairing with the Printer
- Find and connect to a printer with a name format of GCPS01-XXXX (XXXX represents the last 4 digits of the printer's serial number).
- Click on the printer named GCPS01-XXXX when found.
- If a pairing confirmation code pops up, click "Confirm" to complete the pairing.
Step 3: Print Settings
- Use an application that supports Bluetooth printing for print settings and debugging.
- The cloud printer supports 80mm thermal paper. Please set the order format and size for the best printing results.
Tips:
- Due to different device operating systems, the entry points for enabling Bluetooth and Bluetooth pairing may vary.
- When using Bluetooth printing, please ensure your application supports this feature and has obtained the necessary Bluetooth permissions. If you encounter issues, please contact the application provider promptly.
- After successful pairing, you will hear a voice prompt from the Printer.
3.2 Wired Connection Setup
Grab Cloud Printer also supports network cable and USB connections. After connecting, other main devices (such as POS machines or cash registers) can send print commands to the cloud printer to print orders or receipts. Please follow the steps below for connection:
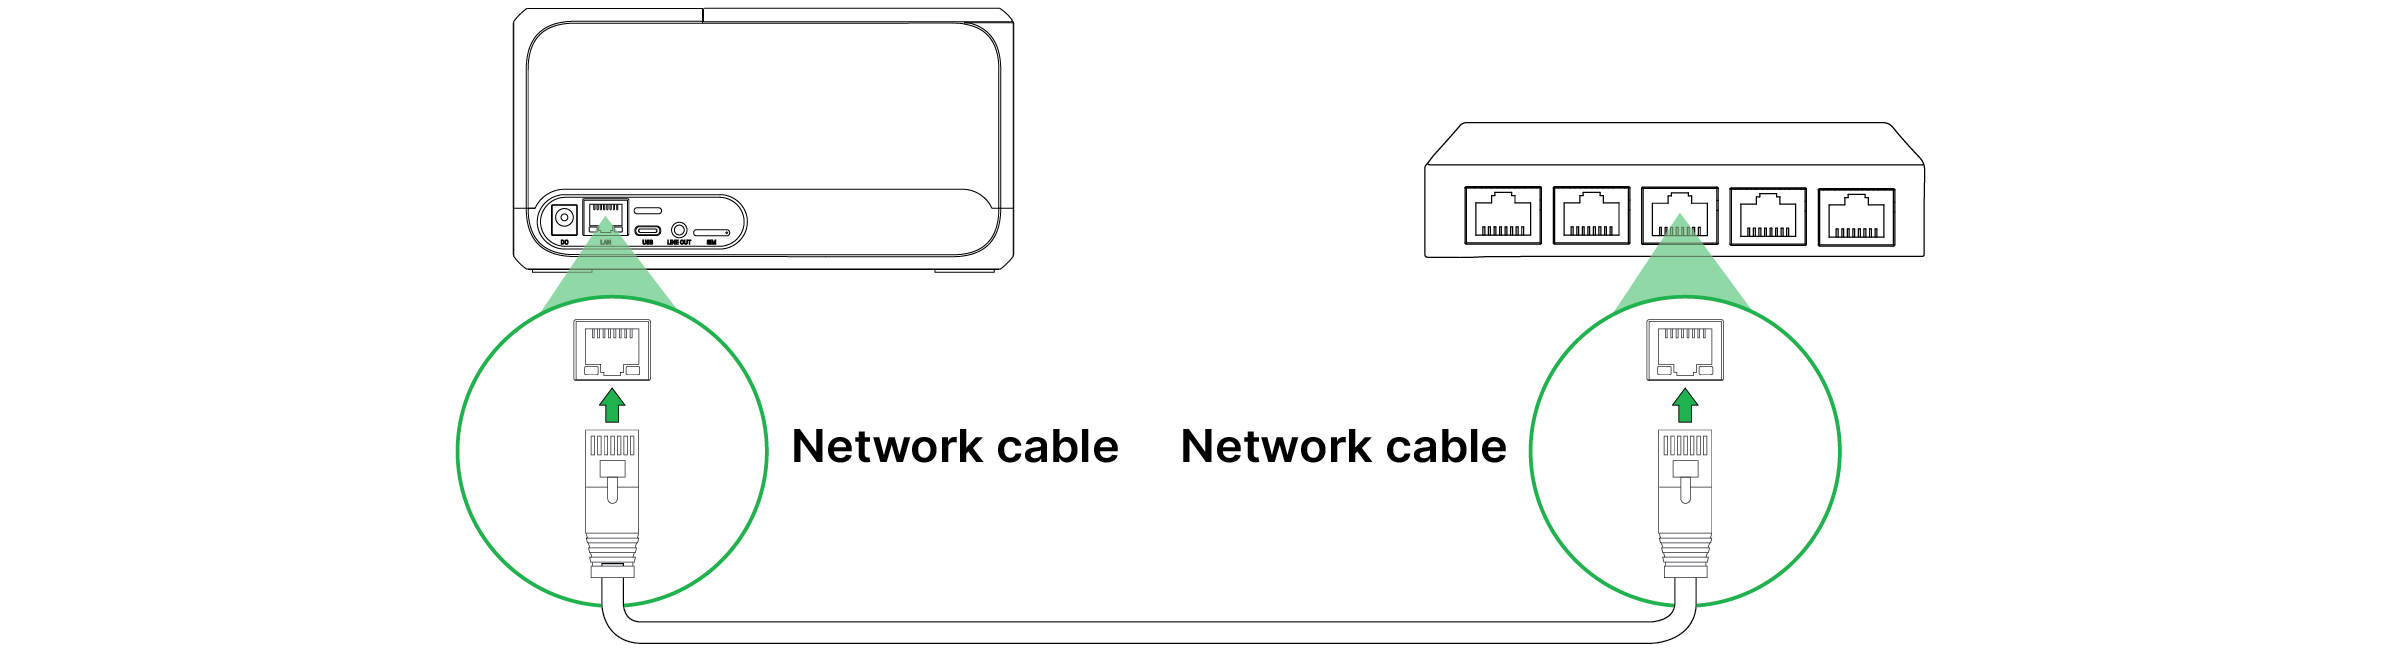
Step 1: Connect Network Cable or USB Data Cable
- Connect the network cable or USB data cable to the network port or USB port of the cloud printer.
- If you are connecting to the USB port on the cloud printer, please use a Type A-C cable for connection.
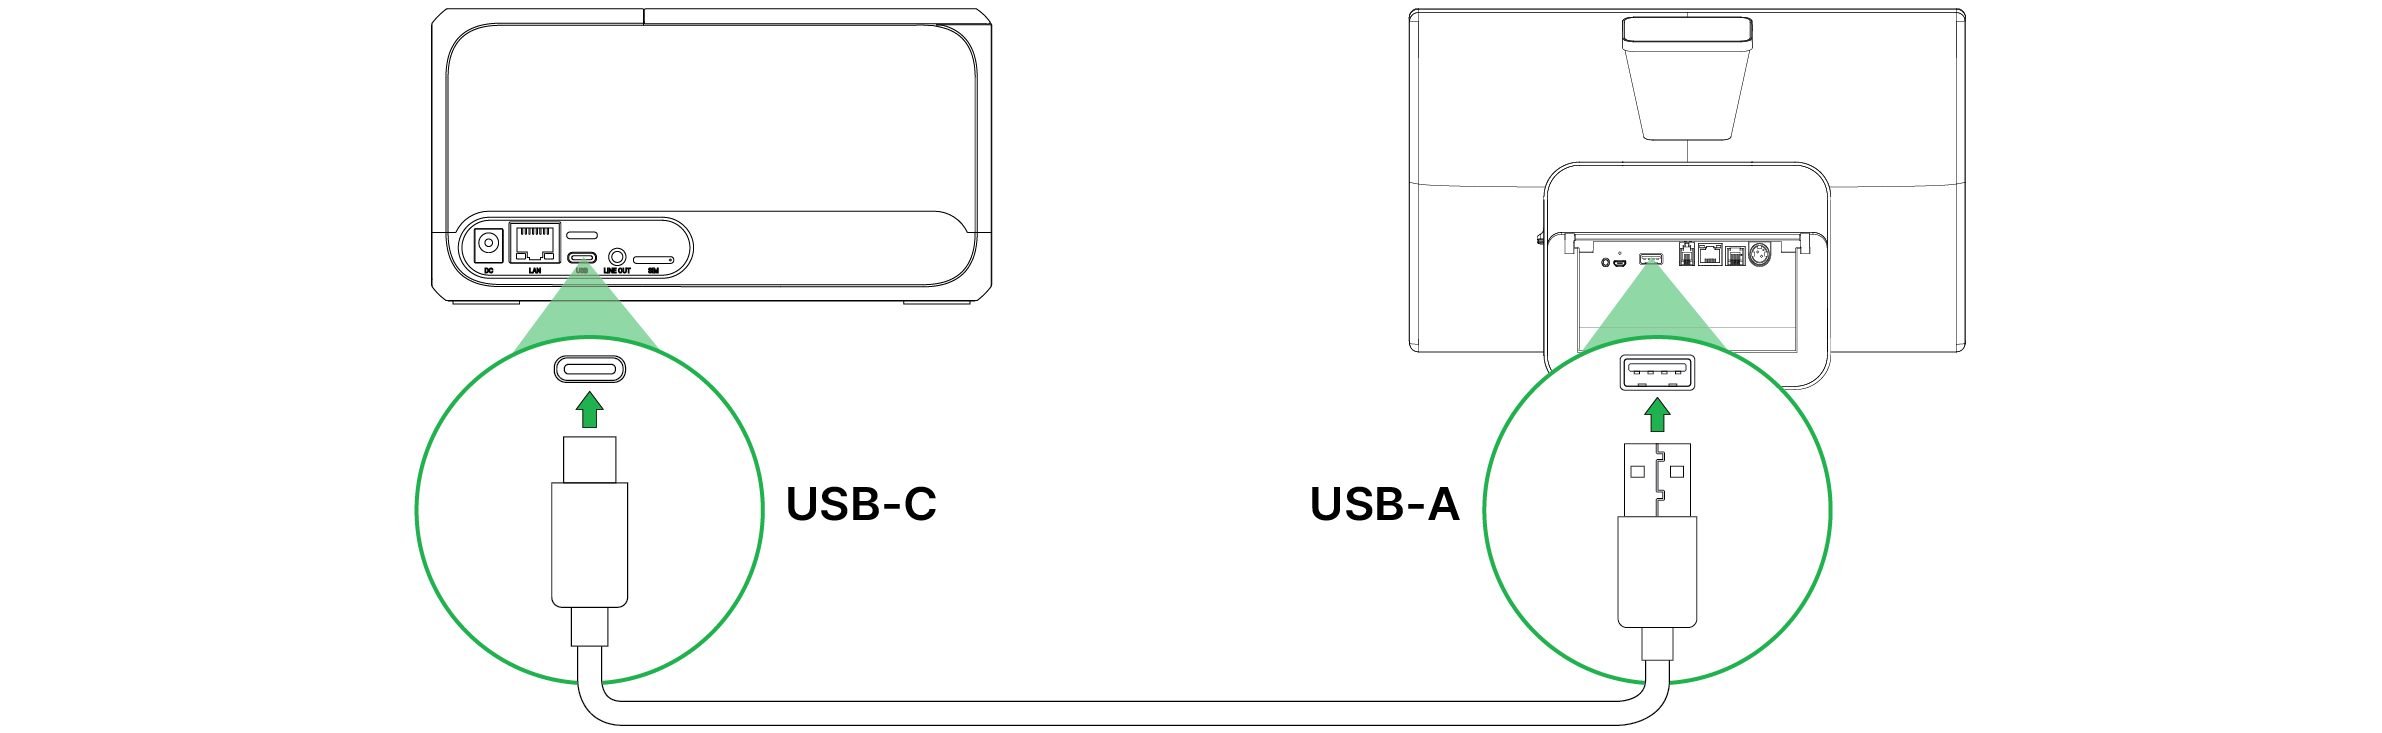
- Before use, ensure that the cable connection between the cloud printer and the router is stable.
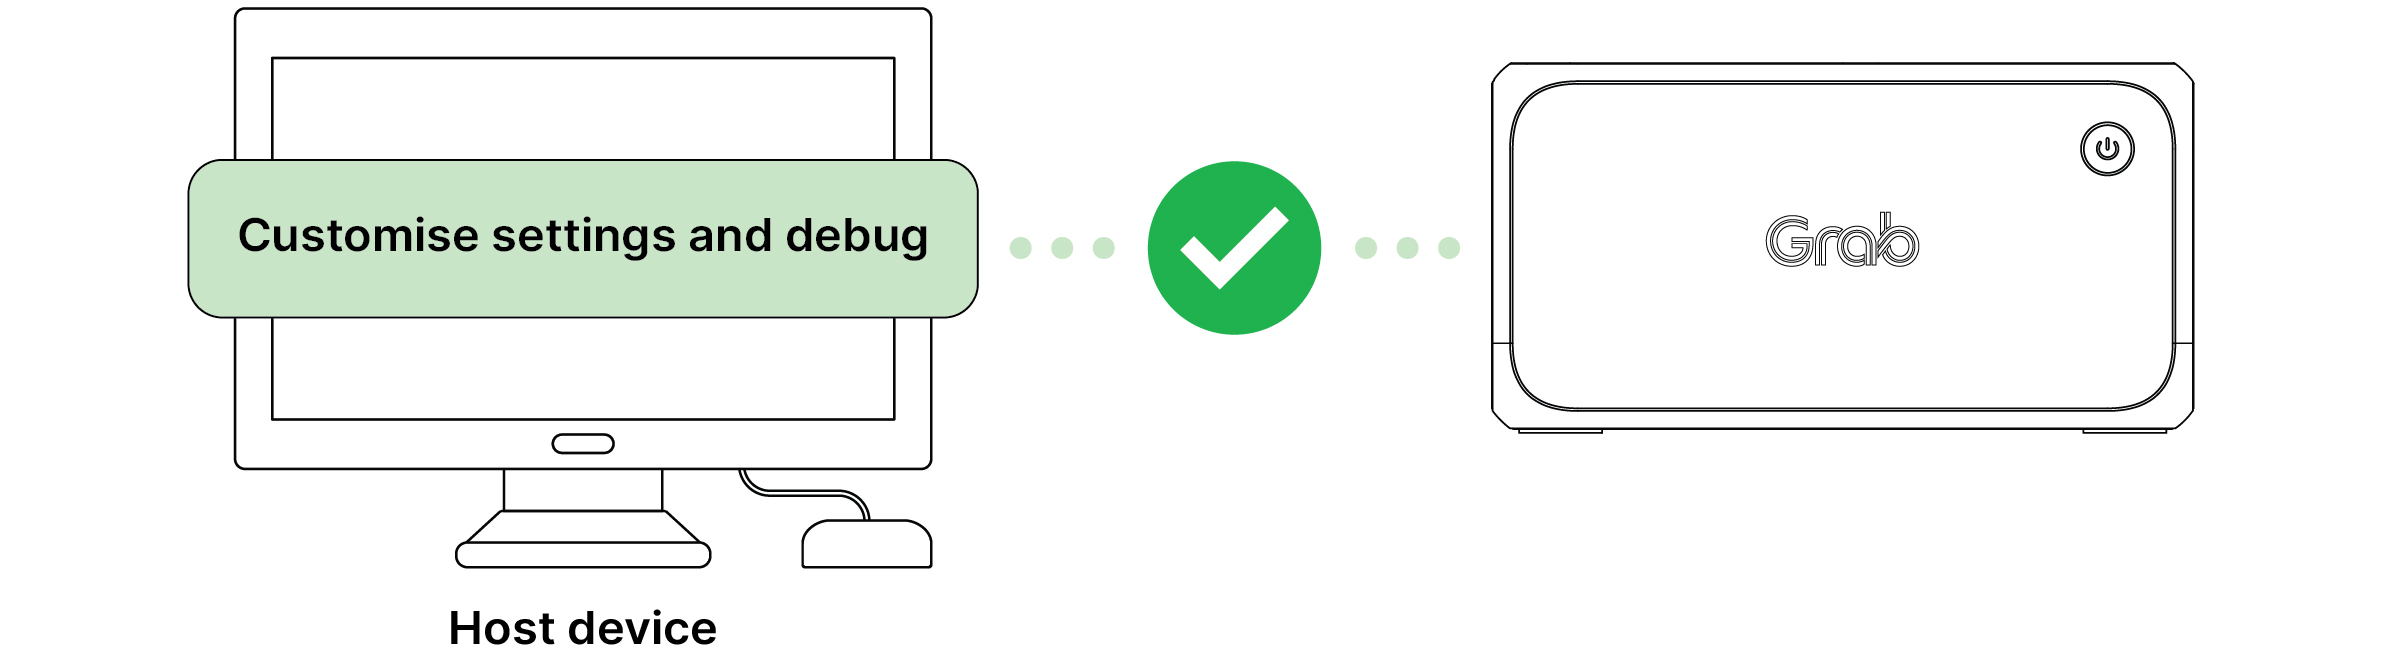
Step 2: Print Settings and Debugging on the Host Device
- You need to select and check on the host device whether the printer is connected correctly. This depends on the brand, model, and supported printer types of your main device.
- If your device can connect to the printer, perform a print test to ensure printing can be executed correctly.
- Given the differences in host device brands and models, if you encounter problems during connection and debugging, please contact the host device manufacturer for technical support.
- The cloud printer supports 80mm thermal paper. Please set the order format and size for the best printing results.
Tips:
- After a successful network cable or USB connection, the cloud printer will issue corresponding voice prompts.
- After connecting the network cable, double-click the power button to access the printer's Debug information page and obtain the LAN IP address for connection configuration.
4. Troubleshooting
4.1 Common issues and solutions
Q. The printer can't be turned on. A. Please make sure the power adapter is connected to the printer and power supply, then press the power button for 3 seconds. If this doesn't work, please contact Grab through your GrabMerchant app for help.
Q. The welcome page wasn't printed after the paper roll was loaded. A. Please check if the paper roll has been loaded correctly into the printer. Please refer to the diagram for the correct way to load it.
Q. The printer has been set up, but nothing was printed out. A. Please check if the correct side of the paper roll was loaded. The printer won't be able to print anything if the wrong side was loaded.
Q. The paper supply LED keeps flashing a red light. A. The printer might be out of paper, or there might be a paper jam. To resolve this, please replace the paper roll or open the printer's lid to remove the jammed paper.
Q. The connection LED keeps flashing or isn't lit. A. This LED lights up when the printer is connected to the internet. It flashes while the printer is connecting and remains off if there is no network connection.
Q. The issue I'm facing isn't covered here. A. You can find a more detailed troubleshooting guide in your GrabMerchant app. If you still need help, please contact Grab through the app.
5. Specifications
5.1 Technical specifications
| Model | GCPS01 |
|---|---|
| Printer specifications | Resolution |
| Print width | |
| Print speed | |
| Dimension | |
| Weight | |
| Paper type | Width |
| Thickness | |
| Direction | |
| Interface | Standard |
| Scanner | Barcode formats |
| Storage | RAM |
| ROM | |
| User interface | Indicator |
| Audio-out | |
| Buttons | |
| Power input and output | AC input |
| DC output | |
| Protection level | Ingress Protection Rating: IP52 |
| Operating and storage requirements | Operating |
| Storage |
6. Safety Reminder

Important safety information:
- Keep the printer away from water and moisture
- Do not expose to extreme temperatures
- Use only the provided power adapter
- Ensure proper ventilation around the device
- Follow all local electrical safety regulations
Disclaimer
The information in this user manual is for general reference only. While we strive to be accurate, we do not guarantee the timeliness, reliability, or applicability of the information. Any reliance on this manual is at your own risk.
This manual may contain links to external websites that Grab does not control. We are not responsible for the content or availability of these websites and do not endorse any views expressed therein.
We strive to keep the manual available and up to date, but Grab is not responsible for any temporary unavailability caused by technical issues beyond our control.